Tuesday, March 24, 2015

A Good Time: 10th Century Sailor Senshi

I haven't mentioned anything about my SCA household so far really. I'm a member of House Strangewayes. We're out of the East Kingdom and most of us live in the beautiful Shire of Quintavia (Central Massachusetts). We're a service household, we're constantly helping run events, gates, dayboards, feasts, retaining and creating things for our Kingdom.

I love my Household, we're a big dysfunctional family, we dress alike, we have our own vocabulary (F'nah), and we love stupid jokes and puns. (Exhibit A: the Sequin Rose Incident)

Which brings us to.... Sailor Moon.


 The Inner Senshi: Sailor Mercury, Sailor Mars, Sailor Moon, Sailor Jupiter and Sailor Venus
 
The Idea:
 
Yes. I did say SCA earlier. I know what you're thinking. Many of the household have otaku and cosplay roots and most of us have seen quite of bit of the series. It was hard to avoid as a nerdy girl of a certain age.
 
So when Elvira, who gets very sudden and very intense ideas, messaged the ladies of the Household in late December about a Sailor Senshi themed group costume challenge it was embraced immediately. Almost too quickly for a pack of late 20's, early 30's ladies who may have just finally grasped their chances to be magical girls and defeat the Negaverse.
 
The Design:
 
Sailor Moons Says: This is a ridiculous idea!
 
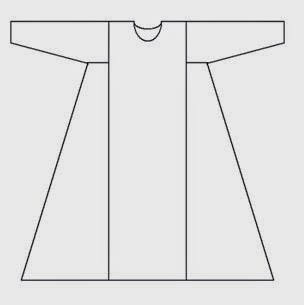
How to interpret this for a large group with vastly different levels of sewing prowess? Easy, 10th century Viking dresses. They are easy to construct, easy to embellish, and in the SCA we often do large felt applique on this style of dress.  
 
The thing about Sailor Moon unlike other superheros is that they all dress in the same base outfit of Japanese school girl outfits/sailor suits with color variations. Each Senshi also has the astrological symbol, in some cases slightly modified, to represent their planet as well. At various points during the series, movies, manga et cetera they get powers or other representations.
 
So, I chose Sailor Moon, because I'm blonde and Sailor Venus was taken. (No one is bitter Elvira)
 
In my case, Sailor Moon is red and blue and has the gold crescent moon symbol. 
 
The Plan: For the underdress I am planning on a white linen base, with a blue linen facing on the neckline for her sailor collar and two red guards on the cuffs to represent the red accent on her gloves.
Underdress

Apron Dress
 
The apron dress is cobalt blue linen with red and gold contrast stitching on the seam lines in interwoven herringbone stitch and will have a red ribbon of wool felt around the base and pale gold crescent moons on each of the three panels. (I don't want the moons too yellow, but we have a kingdom level award for service called the silver crescent and I also do not want to be mistaken for falsely advertising my accomplishments)
 
To top it off crescent moon pins and red beads to represent the front bow. I may also do a back bow appliqued on in wool felt to start the red ribbon that undulates around the hem, I haven't decided yet. I'm trying to walk to line of inspiration vs literal interpretation.
 
Supplies Needed:
  • White Linen - 4 1/5 yards
  • Blue Linen - 4 yards
  • Red Linen - 1/2 yard (I could probably have gotten away with 1/4 yard)
  • Red Wool Felt - 2/12 yards
  • Pale Yellow Felt - 1/2 yard
  • DMC #321 (red) - 4 skeins
  • DMC #729 (gold) - 4 skeins
  • DMC #796 (blue) - 4 skeins
  •  
Using the modified Vigdis underdress pattern from this post and the apron dress pattern from this post I cut out my fabric.
 
Then I realized something. My blue linen was thinner than the usual 58" wide that I use. Which led to adding a second gore at the front and a small gore at the top:
Pretty sneaky if I do say so myself.
 
 
Next time: Embellishing the outfit!


Wednesday, March 18, 2015

Pink: The Barbie Dream Pavilion

My big giant OMG project is what I am calling the Barbie Dream Pavillion: a spoke-wheel pavilion of pink brocade and canvas for the 2015 camping season. This sentence gets me looks when I tell people, then I have to show them my evidence. They still think I'm crazy for sewing my own tent but at least can see my research.

My inspiration:

detail of Luxuria or Lust from
The Seven Deadly Sins and the Four Last Things
by Hieronymus Bosch

Looks like a giant pink brocade spoke-wheel pavilion to me. BOOM ::drops mike:: Damn, there isn't a mike. This is a blog. And I'm a pasty white person. Well, anyway...
 
More illustrations of pink tents in period:
Tempera with gold and silver on panel c. 1495
National Gallery of Art, Washington


The Vision of Constantine
Fresco c. 1452-66
Bascillica of San Francesco, Arezzo Italy
 

c. 1428-1447
from the Cary Collection of Playing Cards held at the Yale Library
Call Number: ITA 109  


Tournament of Inglevert (detail)
Netherlands, S. (Bruges)
 
*Note* Ordinarily I would agree that the red had faded here, but where you can clearly see the saturated red tones on the knights I believe the tents were initially illustrated as pink.


The Color:

If you even think the words "Pink isn't period" let alone let that ancient acid fall from your lips I will find you and bring the attack Laurels with me. As demonstrated above, pink is clearly period. Hot flaming Barbie pink is from cochineal, which is little beetles crushed up in dye from Mexico and one of the first things the Spanish got all hyped up over bringing back from the new world after gold.

A household member Iulia Agricola does a vast amount of maritime history and War of 1812 stuff as well and discussed with me that the pink actually could be a very period color for tents as there is a method of waterproofing canvas by boiling it in tree sap (I believe oak) which would leave a pink color on the canvas.

Looking deeper and deeper into period tent imagry there are quite a few pink tents lurking out there if you know where to look.

Next time we'll talk about design!


Tuesday, March 10, 2015

Art: A Giorgione Courtesan - seducing men hundreds of years later

NPR - oh how I love thee.

Morning Edition on NPR had a story a few mornings ago about an exhibit called Lock, Stock and Barrel: Norton Simon’s Purchase of Duveen Brothers Gallery at the Norton Simon Museum in Pasadena, CA.

The thing that caught my attention was an alleged Giorgione of a courtesan. The article includes a picture:

Bust Portrait of a Courtesan, c. 1509
Zorzo da Castelfranco called Giorgione
Italian, 1477/78-1510
Oil on panel, transferred to canvas
12-1/2 x 9-3/8 in. (31.8 x 23.8 cm)
The Norton Simon Foundation
 
The story here is about the man who purchased the painting, Norton Simon. As they state on the website description of the exhibit:
"Mr. Simon had first expressed an interest in the painting in the late 1950s, but by 1963, despite still some hesitation due to the question of attribution, he agreed with the then-owner of the firm, Edward Fowles, to purchase the painting over a two year period of time. And in the course of those two years, he eventually expressed interest in first an additional seven, and then another five objects in Duveen’s stock, until eventually he decided to purchase the whole of the inventory of slightly less than 800 objects, along with the Duveen gallery building itself at 18 East 79th Street, and its entire library and archive."

But this lady, she's the one who started it all.

The museum is doing a really facinating companion concert called "A Musical Portrait of the Venetian Courtesan" by Tesserae (a Baroque ensemble based out of LA).

The description makes me almost salivate it's so cool:
"The courtesan in Renaissance Venice held a unique social position. Despite a life filled with hardship and danger, she was able to circumvent many of the patriarchal restrictions on women making music. A study of courtesan music is therefore a fascinating window upon the sound world of domestic life in Renaissance Venice. The period-instrument ensemble Tesserae explores this world, from the performance of "high art" madrigals by Barbara Strozzi and San Marco maestri Adrian Willeart and Cipriano de Rore, to lively Carnival songs in dialetto. The performance also includes a re-creation of the lost art of the aria as practiced by the Renaissance improvisatori and instrumental dance music."

Anyone want to charter me a private plane to go to Pasadena for one night? (I'm seeing a special preview of Wolf Hall - the new PBS Masterpiece series set in Tudor England on Sunday in NH)

Monday, March 9, 2015

Viking: A Quick and Dirty Tutorial Viking Apron Dress or “Smokkr”


Viking Apron Dress or “Smokkr”

 
This dress is also called a Hangerok, but it is thought that term is from after the time when these dresses were worn. For an evolution of the Viking Apron Dress see Compleat Anachronist #59.

The pattern here is for the fitted 10th Century version of the dress. This is only one version of the apron dress pattern. There are others. This one is the best I've found for fabric usage and ease of sewing. Again, this pattern comes from Hefdharfru Vigdís Vestfirzka http://www.silverdor.org/viking/vikingad.html


Here's what it will look like when complete:


Measurements:


1.            Bust  + 6 times your seam allowance (around the biggest part of you between your waist and underarms)
2.            Chest to Waist + 1in(from where you want the top of the apron to where you want the flare to start)
3.            Waist to Hem (from where your flare starts to however long you want, generally below the knee to mid-calf)


Yardage:


You’ll need a piece of fabric that is as wide around as measurement (1). The length will be measurements (2)+(3)+(3). This is the bodice plus twice the skirt.


For example:

My bust measurement is 55 inches.

My bodice is 10 inches.
My skirt is 40 inches.


Therefore, I will need a piece of fabric 58 inches wide by 90 inches long.


I can get a whole calf-length apron dress out of 2 1/5 yards of 55" or 60" wide fabric. Which is nice considering how expensive wool is!


I will end up cutting a 2 inch strip off the side which I will use as the straps. If you are exactly the same measurement around as the fabric you are using, you will need about 4 inches more fabric length for the straps (or you can use some card or inkle weaving).


To cut out your fabric:


You will need a yard stick/measuring tape/piece of string for this as well as a piece of chalk that contrasts with your fabric.

Take your big rectangle of fabric, fold it in half long-ways and spread it out flat with the selvedges touching (the finished edge of the fabric as it comes off the bolt)

Mark the lines according to the above layout in chalk then cut out along the chalk lines. Be sure not the cut the fold!


If you lay them all out, you'll then have pieces like this:
 

Sewing the Body

 
1.      Attach the smaller triangles to the side back pieces.

2.      Sew the pieces in the above order.  Side back 1, Gore, Front, Gore, Side back 2, Gore
  • Note: When sewing the gores (the larger triangles) be sure to align the tops first when doing the back, you can always even the hem later, but if the seams are not aligned they cannot be hidden. Especially if you want to do some embroidery!
3.      Sew the last seam to form the dress into a flared tube. You may need to take in the waist part a bit, if you have more of an hourglass shape.

4.      Fold the top edge over 1 inch and sew down. I like using a bit of decorative stitching to do this to embellish the seam. If you are adding tablet weaving or trim at the top add that now.

5.      Trim the bottom edge of the dress so it is even, then hem it. 
 
Once the pieces are all together you should be able to pull the dress on over your head. It should fit around your bust and flare right over your hips. Test this. Test this before putting trim on. There is no crying in historical reenactment sewing, unless you don't try things on while sewing.

Straps:


To make straps, take 2 strips of fabric about 18 inches long by 4 inches wide. (mine are 2 inches wide, which just means I don’t fold them)

Fold them into tubes right-side in, stitch, turn right-side out and press.

Turn in the ends and stitch down so the tubes are closed.

To place the straps, pin them in place 1-2 inches on either side of the center back seam and sew them down

They should go inside the dress, not outside.

The front end of the straps are best left loose and fastened with your brooches. This way you can adjust the fit, a good idea because linen has a tendency to “grow” in heat.
 

Strap Variation:


You can also make smaller tubes (1/2 inch when finished) of fabric and make doubled straps.

This way you are not piercing the fabric with your brooches but attaching them to the loop at the front of your dress and through the loop of the doubled strap.
You will have two long loops which will come over your shoulders and two short loops at the front of the dress.
You will have to more precise with your strap measurement with this method.
I suggest stitching down one side of the tube of each strap and adjusting the other with a safety pin until it is correct.
You can also attach the back of the loops at the center back or one of the ends of the loop at the center back and one straight making an M shape. These variations are especially useful if you have sloped shoulders and straps tend to slide off.


*DING* Dress is done!


Further Resources:

  • Overview on one extant apron dress (author calls it a pinafore)http://www.shelaghlewins.com/reenactment/hedeby_apron/hedeby_apron.htm

Friday, March 6, 2015

Viking: A Quick and Dirty Primer on Women’s Viking Garb

I taught a class on Viking women's garb at Harper's Retreat in the Barony of Stonemarche in August 2011, these are my class notes.

The Apron Dress pattern/instructions are here.
 
 
Viking / Norse Underdress:
The “Vigdis” Underdress pattern from Hefdharfru Vigdís Vestfirzka http://www.silverdor.org/viking/underdress.html
This is a conjectured pattern, so there are no period sources. However, the pattern is designed along the same lines as period finds, using a waste-free method of cutting and all straight lines. This pattern can be shortened easily for a man's tunic.
Here's what it will look like when complete:
There are two available layouts included in this post. One is for the dress as outlined on Vigdis’s website and the other is my modification to allow for bigger side gores.
Both layouts use the same measurements and construction techniques.
 

Measure:


1. Shoulder to Floor
 

2. Around Fist + ½ inch


3. Over the shoulder to underarm


4. Underarm width (usually between 6 & 10 inches) divided by 2


·      
  • To take this measurement, imagine a line coming down from the point where you measured your shoulder to about mid-chest and another coming down your back from your shoulder, measure between these two under your arm
  • Don't skimp on this measurement, or you will blow out this seam on a regular basis


5. Shoulder to Shoulder (front and back, use the larger number.


6. Arm length from shoulder


Add 1 inch to each measurement, this is your seam allowance.

 
To figure how much fabric you need choose a layout:

Layout 1: take measurement (1) and double it
 
 
Layout 2: add measurements 1 and 3 together and multiply by 2.
 
 
Divide by 36 to get your yardage for either layout
 
 
Using me as an example:
 
 
1.      64"

2.      11"

3.      12"

4.      4"

5.      20"

6.      27"
Using Layout 1: 130” or 3 2/3 yards
 
Using Layout 2: 156” or 4 1/3 yards


To lay out your pattern:
Supplies: You will need a yard stick/measuring tape/piece of string for this as well as a piece of chalk that contrasts with your fabric.
     
  1. Take your fabric and fold it in half selvedge to selvedge the short way, then spread it out flat on the floor.
  2. Mark everything out like this according to your layout of choice.
  3. Then, cut on the chalk lines. Make sure you cut out the neck hole...
Layout 1:


Layout 2: 
(fold is at the top on this layout as well)


Sewing Directions:
     
  1.  Sew the top of the sleeves together along the (6) measurement.
  2.  
  3. Sew the gores to the sleeves at the (4) measurement. Be sure you have opposite sleeves here, it can get confusing if you are using fabric without a right and wrong side
  4.  
  5.  Finish the neck hole. (Make sure it's big enough to go over your head)
  6.  
  7. Sew the gore/sleeve parts to the body of the dress.
  8.  
  9.  Sew the sides from wrist to hem.
  10.  
  11.  Hem the sleeves.
  12.  
  13.  Hem the bottom.


Ding! Dress is done!


This is a great base layer for so many styles and very fabric efficient. I have several of these that I sleep in at events.


For the Apron Dress pattern see this post.


Again, I want to make sure you are aware that the under arm seam can blow out easily if you don't do a couple things 1) Add enough ease. 2) Flat fell your seams in one direction. If you flat fell the seam here open you will regret it.


For an underdress pattern without this issue look for the Eura  underdress. There is a gore that goes from hem to wrist on that layout and it is also fabric efficient however slightly harder to pattern. I'm sure I'll get to a tutorial on that.
 
Embellishment is perfect for this, decorative seam stitches are perfect and I have one with a blanket stitch around the collar and cuffs. You could also use the herringbone stitch either single or double up and down the seams.


Herringbone stitch


Thursday, March 5, 2015

Italian Dresses: The Lovely Italian Puff Sleeve

I wrote up this tutorial for a household member recently who is delving into 1530s Italian garb

Isabella d'Este by Rubens
copy of a lost 1529 portrait by Titian


The Lovely Italian Puff Sleeve

by Lady Fortune St Keyne

Illustrations brought to you by MS Paint and the number 1997


 The basic sleeve consists of 3 pieces:

  1. Puff – fashion fabric
  2. Lower Sleeve - fashion fabric
  3. Lining – I recommend silk or at least a satin weave here, as a lining fabric

(The lining gives everything structure, under no circumstances skip the lining, you will be sad)


Drafting Notes:


The easiest shortcut is to take a modern sleeve pattern that fits you and draft the puff and lower sleeve from that pattern. If you want to be a cool kid draft your own sleeve lining from your measurements.

1. The Puff - basically an exploded version of the top of the sleeve lining pattern. It should be 1 1/2 to 2 times the width of the sleeve lining at least and 6 inches at least longer.
  • Pro-Tip: I usually hold a tape measure up to my shoulder and allow it to droop around my elbow to get the length.
  • If you are doing the shirred or puckered version of this sleeve cap add even more width.
The point of this sleeve was to look like an Italian linebacker… before there were linebackers.


2. The Lower Sleeve – the lower half of the sleeve lining pattern measuring from elbow to cuff. Add seam allowance to the top measurement.
  • Pro-Tip: If embellishing the lower sleeve you may want to add a light canvas layer, or if using silk a layer of flannel as an interlining to give the fabric more body. You’d be amazed the difference it makes, this is how they make really nice silk drapes.
  • Do these embellishments before sewing, and if using flannel baste it to the fashion fabric layer so they act as one, then cut off the flannel from the seam allowance to reduce bulk.
 
    3. The Lining – it’s lining! Make sure you have enough ease (extra space) for your chemise/camicia, as you’ll need to stuff that bad boy down in there.


Assembly Notes: 


First up on the dance card is the Puff and the outer or fashion fabric.

  1. Prepping the Puff – sew two gathering rows of basting stitches set as long as my machine will allow and tie off the ends together. Pull gently and gather into the top of the lower portion of the sleeve. Keep this as even as possible.
  2. Sew the Puff and the lower sleeve together at the gathering. Do it again when you realize you left your machine set to basting stitches. Refuse to feel alone as literally everyone has done this.
  3. Sew the outer sleeve in a malformed tube. “It’s ok tube,” you say, “I love you.”

The Lining –

  1. Sew into a tube! This will not be malformed, and you will love it no more or less.
 

Sewing it all together – Here we have a choice, like Robert Frost in the wood, you can take the Hardcore option or the OMG I HAVE TO WEAR THIS IN LIKE 2 HOURS (OMGIHWTL2H) Option.

HARDCORE:


We’re going to start with the Hardcore Option. I believe in knowing what you’re supposed to be doing and then you can make educated shortcuts.

What makes the Hardcore Option so Hardcore? Since really, it is pretty easy. Hand sewing. Well, hand sewing and that it’s more in line with how sleeves and garments would have been constructed in period. In the tailor’s shop each apprentice would be assigned a certain task. So there was a Sleeve Guy. Sleeve Guy made the sleeves independent of Bodice Guy and Skirts Guy. The sleeves were fully finished by him and then attached to the finished bodice. So by finishing the armscye and the sleeve head and whip stitching them together you are mimicking that construction method, even though you are Sleeve Guy, Bodice Guy, Skirt Guy… et cetera.

Now how to do it:

1. Take your two tubes which you love very much and nest them within each other with right sides together. Pin at the seam allowance, pin at the top of the sleeve head and about a quarter of the way up each side from the seam.

  • You don’t want to fully pleat your armscye, the extra fabric under the arm will become uncomfortable.


2. Starting at the center pin at the sleeve head pleat the excess fabric to the lining.

  • I use inverted box pleats, I think that lends enough volume to the top of the puff. If you want to turn up the volume or have a lot of excess to pleat in you may want to use stacked box pleats.
  • Another option I’ve used is an inverted box pleat at the top and knife pleats down each side in opposite directions.
***See the end of the post for examples of pleats***

3. Sew the pleats down, invert the tubes so they are right sides out and press slightly around the armscye, this will help later as you are hand sewing it and also helps set the pleats. Also press
the seam allowance of the cuff inside on the outer fabric and the lining and iron this down.

  • Try the sleeve on. Realistically imagine stuffing the gorgeous huge sleeves of your camicia into them. Determine to make new camicia with tighter sleeves. Someday.


4. Hand sew the cuffs closed and hand sew the sleeve head to the armscye leaving the bottom of the sleeve open where the fabric is not pleated for side –lacing dresses.


5. At the joint of the outer sleeve, stitch by hand using the backstitch to attach the lining and the outer sleeve together. This will prevent the sleeve from drooping.


DING! Sleeves are done!


Now, how to cheat at it because it’s late and you promise in your heart of hearts to do it right later. (Later never comes gentle reader, be wary!)


The OMGIHWTL2H Option –


  1. Take your two tubes which you love very much and nest them within each other with right sides together. Align the seams at the cuff and sew.
  2. Invert your sleeve so the wrong sides are together. Pin at the seam allowance, pin at the top of the sleeve head and about a quarter of the way up each side from the seam.
  3. Starting at the center pin at the sleeve head pleat the excess fabric to the lining.
  4. Sew the pleats down using a smaller seam allowance than usual. If you usually use a 5/8 seam allowance, use a ½”, if you usually use ½” use ¼”. This will keep these stitches hidden when you attach the sleeve.
  5. Sew the sleeve head to the armscye leaving the bottom of the sleeve open where the fabric is not pleated for side lacing dresses.
  • Hopefully you serged your fabric and the serged edges will be hidden under your arm. There is no pretty way to do this quickly, you can either sew the edges over or pin the raw edges in to each other and top stitch the unpleated section.

6. At the joint of the outer sleeve, stitch by hand using the backstitch to attach the lining and the outer sleeve together. This will prevent the sleeve from drooping.
  • Or use a safety pin on the inside of your elbow. Again, with the promise to do it right later.
  • You can try to do this by machine using the “stitch in the ditch” method, I find it easier to control by hand.
Ding! Dress is done!

 And pretty as a portrait!


Pleat Examples:

All of these except the rolled pleats are great options here.