
I taught a class on Viking women's garb at Harper's Retreat in the Barony of Stonemarche in August 2011, these are my class notes.
Viking / Norse
Underdress:
The “Vigdis”
Underdress pattern from Hefdharfru Vigdís Vestfirzka
http://www.silverdor.org/viking/underdress.html
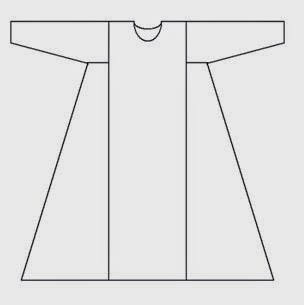
This is a conjectured
pattern, so there are no period sources. However, the pattern is designed along
the same lines as period finds, using a waste-free method of cutting and all
straight lines. This pattern can be shortened easily for a man's tunic.
Here's what it will
look like when complete:
There are two
available layouts included in this post. One is for the dress as outlined on
Vigdis’s website and the other is my modification to allow for bigger side
gores.
Both layouts use the
same measurements and construction techniques.
Measure:
 1. Shoulder to Floor
2. Around Fist + ½ inch
3. Over the shoulder to underarm
4. Underarm width (usually between 6 & 10 inches)
divided by 2

·
- To take this measurement, imagine a line coming down from the point where you measured your shoulder to about mid-chest and another coming down your back from your shoulder, measure between these two under your arm
- Don't skimp on this measurement, or you will blow out this seam on a regular basis
5. Shoulder to Shoulder (front and back, use the larger
number.
6. Arm length from shoulder
Add 1 inch to each measurement, this is your seam
allowance.
To
figure how much fabric you need choose a layout:
Layout 1: take measurement (1) and double it
1. 64"
2. 11"
3. 12"
4. 4"
5. 20"
6. 27"
Using
Layout 2: 156” or 4 1/3 yards
To lay out your pattern:
Supplies: You will need a yard
stick/measuring tape/piece of string for this as well as a piece of chalk that
contrasts with your fabric.- Take your fabric and fold it in half selvedge to selvedge the short way, then spread it out flat on the floor.
- Mark everything out like this according to your layout of choice.
- Then, cut on the chalk lines. Make sure you cut out the neck hole...
Layout 1:

Layout 2:
(fold is at the top on this layout as well)

Sewing Directions:
- Sew the top of the sleeves together along the (6) measurement.
- Sew the gores to the sleeves at the (4) measurement. Be sure you have opposite sleeves here, it can get confusing if you are using fabric without a right and wrong side
- Finish the neck hole. (Make sure it's big enough to go over your head)
- Sew the gore/sleeve parts to the body of the dress.
- Sew the sides from wrist to hem.
- Hem the sleeves.
- Hem the bottom.
Ding! Dress is done!
This is a great base layer for so many styles and very fabric efficient. I have several of these that I sleep in at events.
Again, I want to make sure you are aware that the under arm seam can blow out easily if you don't do a couple things 1) Add enough ease. 2) Flat fell your seams in one direction. If you flat fell the seam here open you will regret it.
For an underdress pattern without this issue look for the Eura underdress. There is a gore that goes from hem to wrist on that layout and it is also fabric efficient however slightly harder to pattern. I'm sure I'll get to a tutorial on that.
Embellishment is perfect for this, decorative seam stitches are perfect and I have one with a blanket stitch around the collar and cuffs. You could also use the herringbone stitch either single or double up and down the seams.
Herringbone stitch


No comments:
Post a Comment